USBASP firmware update
The USBASP is a popular and inexpensive programmer for AVR controllers. These are frequently sold with an outdated firmware. Find out below how to easily update it to support TPI and get rid of warning messages.
The problem
The USBASP is an open-source in-circuit programmer for Atmel AVR controllers designed by Thomas Fischl. On his website1, you can download the most recent firmware and find all the information to build one. You can also buy it for really cheap from several places on the web. However the cheap versions may have an outdated firmware. One sign of old firmware is the following warning message:
avrdude : warning : Can not Set sck period . usbasp please check for firmware update .
However, this is just a warning and the programmer is probably still uploading the files correctly. One feature your USBASP is missing is the support for Tiny Programming Interface (TPI)2 required to program smaller AVR microcontrollers like the ATtiny10. Therefore if you want to program the ATtiny10 you better update the USBASP. Updating the firmware it’s relatively easy and can be done with just an Arduino and some jumpers.
 - a common USBASP programmer -
Set up Arduino as ISP
We need Arduino to act as a programmer. To do so we just need to upload a sketch already available within the Arduino examples. Therefore from the Arduino IDE:
- Go to File > Examples > ArduinoISP
- Connect Arduino
- Click on Upload
Done. Now Arduino is ready to upload a firmware to another device, the USBASP in our case.
Wiring
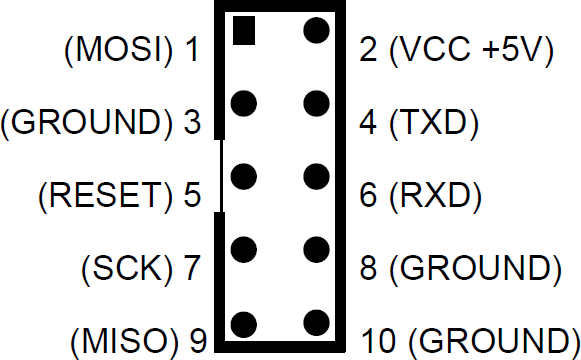
The following scheme shows the connections between the Arduino pins and the USBASP. Double-check the connections as most of the issues will come from a loose wire or wrong pins connected.
| Arduino | USBASP |
|---|---|
| 5V | 2 |
| GND | 10 |
| 13 | 7 |
| 12 | 9 (MISO) |
| 11 | 1 (MOSI) |
| 10 | 5 (RESET) |
Close jumper 2
Make sure you close the JP2 in on the USBASP board. Without doing so the board cannot be reprogrammed. To close jumper 2 on the USBASP you can solder something to it or simply use a wire and tighten it to both holes. Make sure it doesn’t move and lose the connection halfway the firmware upload.
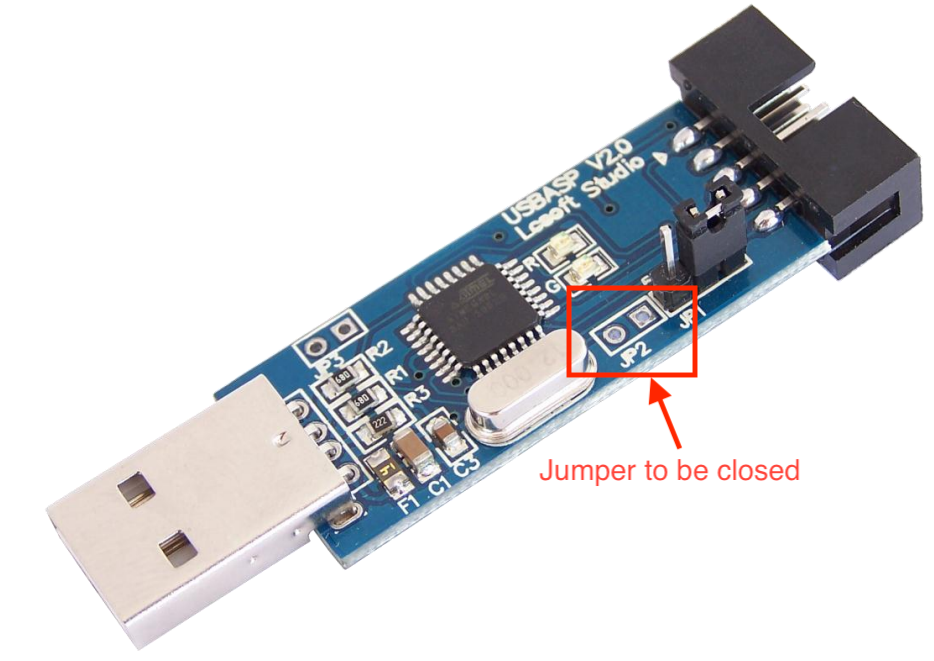 - close the jumper using even just a wire or a paper clip. No need to solder. -
Firmware
The firmware can be downloaded from Thomas Fischl website. Once you have downloaded the latest version you should find a .hex file inside the archive. That is the file we’ll upload to the device. In case of the 2011 firmware (the most up-to-date the time of writing), is the following:
usbasp.atmega8.2011-05-28.hex
avrdude
The final step is to upload the firmware using avrdude3. I will assume you have the Arduino IDE installed. Then the easiest way to get Avrdude is to look for it inside the Arduino IDE files (alternatively you can get it from the web). The avrdude executable will be at the following location:
ARDUINO FOLDER"/Java/hardware/tools/avr/bin/
We will also need a configuration file avrdude.conf that can be found here:
ARDUINO FOLDER"/Java/hardware/tools/avr/etc/
Copy4 these two files and paste them inside a folder together with the firmware file (usbasp.atmega8.2011-05-28.hex in this case).
Then you need to identify the port used by Arduino. To find it:
- Connect Arduino to the USB
- Open the Arduino IDE
- Go to Tools>Port
Make note of the port used (/dev/cu.usbmodem14101 in my case)
From the terminal navigate inside the folder where you placed avrdude and type the following command using the right port for the option -P
./avrdude -C ./avrdude.conf -p m8 -c avrisp -P /dev/cu.usbmodem14101 -b 19200 -U flash:w:usbasp.atmega8.2011-05-28.hex:i
Done! If you don’t get any error message, your USBASP is ready.